Showing posts with label Terrain. Show all posts

Sunday, August 6, 2017

4Ground Northwest European Farm Buildings (20mm) Review

At long last, I have the opportunity to post a review for the collection of 20mm farm buildings I bought a few weeks ago from 4Ground. My planned Chain of Command campaigns take place in the rolling farm fields outside Caen, so I knew a collection of agricultural buildings would be a must. As I've been very impressed with the 4Ground kits I've gotten thus far, I saw no reason to stop.

The first building I put together (I actually got two of them) was the North West European Hay Loft. A simple, but practical structure, this building will look great among the large wheatfields that feature in the Scottish Corridor campaign. Not too much to say here. The construction was straightforward and it came together in less than a half hour. Overall, a fairly handsome little structure with removable roof and staircase. I may put some dirt on the ground floor and pick up some hay bales at some point, but I'm glad to just have them to throw out on the table for now.
The completed loft

The loft's second floor interior

The lower floor and stairs
Next was the Dairy/Lean To. I wanted a small building for my farms and thought this would do the trick, but I did not realize at first that this model was just an add-on and, thus, only had three walls. It will add some variety, but undeterred, I bought a second that, when put next to the other, creates a workable (at least I think so) outbuilding.

Dairy exterior

Dairy interior

Ersatz outbuilding (good enough when needed)
Next came my favorite building, the North West European Granary/Cart Shed. Definitely the largest of the lot, this structure was not as intimidating to piece together as I'd thought. It has a nice mix of open ground floor and enclosed top floor, which should provided some useful cover for any defending troops. It also features a mixture of building materials which make it stand out even more. As always, the finished interior on the top floor is a nice touch. I may pimp out the ground floor a bit and maybe get a wagon for one of the stalls, but it's battle-ready for the time being.

Granary/Cart Shed

Upstairs interior

I really like these inlays

Rear detail
Since I needed more buildings than the variety offered, I bought two of the North West European Threshing Barn. Though I've assembled four-wall 4Ground buildings before, I had trouble with both of these. The problem seemed to be gluing the outer walls onto the inner ones fast enough so that the glue would not dry, but then I couldn't seem to get the recommended rubber bands and clothespins on fast enough to prevent the walls from warping slightly. Even leaving the bands and pins on for more than a day didn't seem to help much. The second one definitely came together more easily (though both were definitely messy affairs), but in my haste, I glued the long outer walls on the wrong side, so the vent holes don't match up perfectly with the inner ones. Nevertheless, it doesn't look half bad, and its enclosed design will stand out from the more open buildings. Wouldn't mind trying it again some time (maybe I'll try gluing the walls together first and then attach them to the floor).

The Threshing Barn

Threshing barn interior, showing some of the warping
The last building was the only one I decide to experiment with upgrading, but I felt like a pigsty without dirt and mud just wouldn't look right. As I've stated before, though I'm a veteran wargamer, I have never really done much when it comes to terrain construction or painting before, but figured this would be an easy project on which to experiment, I picked up some brown battleground basing material and wet mud paint from The Army Painter and applied them liberally throughout the pigsty. Though the dirt settled nicely, I was a little disappointed with the mud. I applied an undercoat and then, as instructed on the bottle, hit it with varnish and put another coat on to bring out more of the gloss, but it didn't turn out as expected. I tried the process again, but it still didn't have the glossy effect I hoped for. Perhaps it is just slightly dried mud. :-)

The finished Pigsty/Chicken Coop

The interior of the chicken coop

The interior of the pigsty

Finally, I picked up some accessory packs. I got some of the stone walls and stone walls with gates kits. These are super easy to assemble (and inexpensive) but will add a lot to the table. I also purchased some telegraph pole kits. I was really looking forward to these as I thought they would be a really nice detail that would add a level of realism to my setups. The straights were much lighter than the gate sections, so I hit them with a wash of Vallejo smoke, which helped a little. Might need to add another coat (and do the same to some of the stone buildings). While the base and poles were easy to glue together, but most of the more fiddly pits are made of a very flimsy cardboard that often separated as I tried to cut the pieces out or glue them to the poles. Though I got a few of those pieces on, it was turning out to be much more frustrating than I had hoped. Losing my patience (and terrain-making fun), I decided just to leave a couple as is and save them to be used as Rommel's asparagus - poles with mines mounted on top - if I ever decide to do the 29 Let's Go campaign.

I added some dirt to the walls and put a wash on some of the lighter sections


A sampling of some of my telegraph pole attempts

The untouched sheet of pole bits - the bane of my terraining existence
Though the kits did not all turn out as planned, I'm rather pleased with my acquisitions overall and can't wait to get them on the tabletop with my long-awaited figures. For those looking for farm building kits, I'd highly recommend the Hay Loft, Cart Shed/Granary, Dairy/Lean To, and Pigsty (as well as the stone walls). They are available for 15mm, 20mm, and 28mm figure scales.

Monday, June 19, 2017

Plastcraft Bridges Review

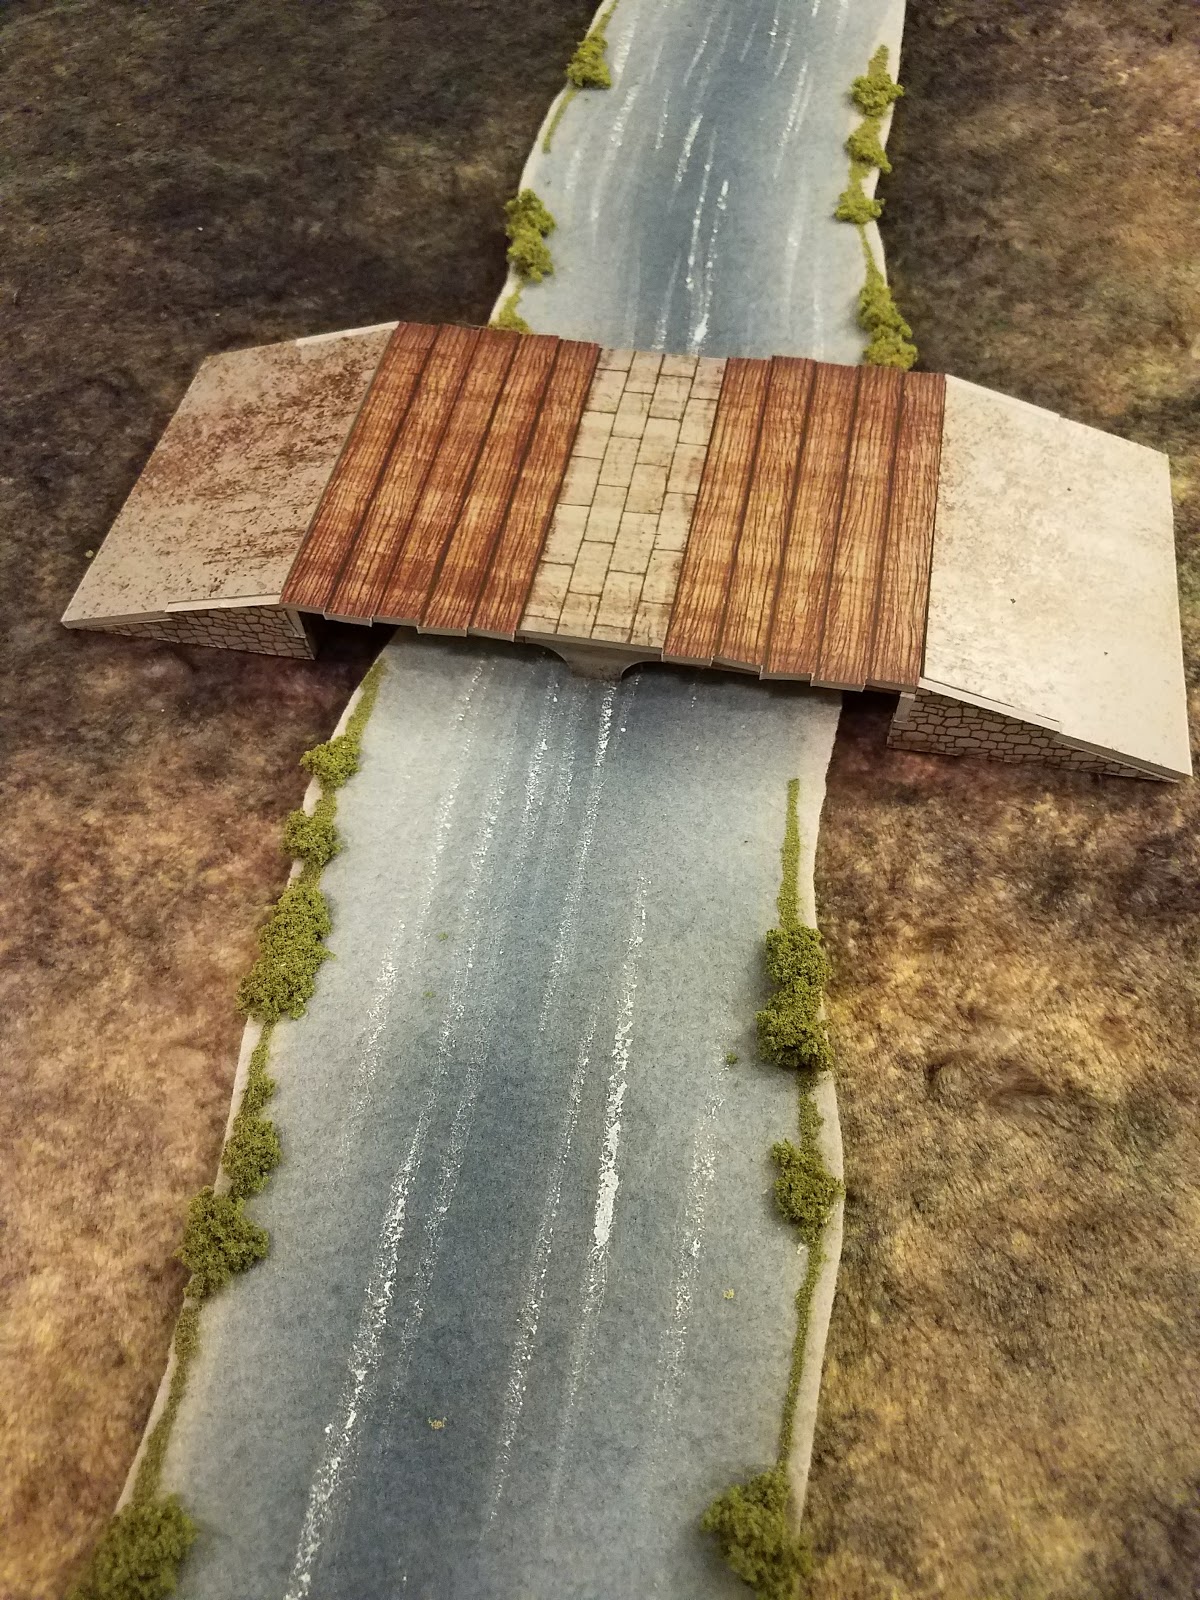
One of the purchases I made at the Williamsburg Muster last month was a set "medieval bridges" from Plascraft Games. Though designed for use with the SAGA rules system, the two pieces are fairly generic, and since my collection was lacking in bridges, I figured it was a useful set to pick up.

These are rather simple kits, and so there is not much to write, but I am very pleased. Each bridge is just a few pieces and I was able to glue them together in a matter of minutes. I thought the buildings from Plastcraft had been pretty straightforward, but these were even easier!

As one of the ColorED offerings from Plastcraft, they are completely game-ready once the superglue sets.

Here are a few photos to illustrate the finished products

The arched bridge:


My rivers from Hotz mats are almost perfect-sized

Some views of the plank bridge


Another great view with the Hotz rivers

Thursday, March 23, 2017

Cold Wars 2017 Wrap Up

I apologize for the silence from Hanover the past six weeks or so. I was waiting on some purchases to arrive and was settling into a new job. This, I am glad to report, is at the Seminary Ridge Museum in Gettysburg, Pennsylvania. For those not familiar with the intricacies of the battle, the museum is house in the oldest building on the grounds of the Lutheran Theological Seminary, which was at the center of the fighting on July 1, 1863. The museum covers the events of that day, the building's use as a hospital for weeks after the fighting, and the role the seminary and surrounding community had in the development of faith and emancipation in the American Civil War. My role is largely managing the museum tour, but I also lead tours of the building's famed cupola (which offers a stunning view of the battlefield) and the seminary's campus. Though this position is only part-time and seasonal, it is a great fit for my interests and professional experiences and I have been enjoying it immensely thus far.

Schmucker Hall - The seminary's oldest building and my new workplace
Regarding my ongoing Chain of Command project, I finally received all the bits of terrain, extra vehicles, and accessories that I ordered after Christmas. Once I get the last of my 4Ground farm buildings assembled, I'll post a review. While I was hoping to pick up my infantry from my painter at the convention this weekend, but he's got a lot of other irons in the fire at the moment and will have them for me in a few weeks. I did however, get to pick up the rules and tokens from the Disposable Heroes 2 Kickstarter I backed in December (I had played a demo with the author back at Fall In! in November) and am looking forward to testing that ruleset out as well when the minis arrive.

Then came Cold Wars. One of the many advantages about being back in Pennsylvania is my proximity to the HMGS East shows, especially those at the Lancaster Host (located just an hour away). Just as in November, I was fortunate enough to get both Friday and Saturday off from work, and so was able to take it a good deal of the show. I was signed up for a participation game on Friday morning, but it was not what had been advertised in the Preliminary Events List, and instead utilized a set of homebrew rules that were terribly-written. As a result, I politely took my leave and killed some tiem walking around the gaming and tournament areas and grabbing lunch. Then, I moved onto the vendor area where I caught up with some friends and made some purchases. Once it opened, I made a pass through the flea market but didn't see anything that piqued my curiosity.

The vendor area in all of its glory
A photo from a Helm's Deep game in the main gaming area

More of Helm's Deep

A shot from the awesome World War II Burma Campaign game at the Wargames Illustrated booth (it won the best of show award)
After some more time catching up with my friend Chris from the Phalanx Consortium (a good friend from my Williamsburg days) in the vendor hall, I grabbed a quick dinner (from the awesome pig roast the hotel always puts on for the show in the lobby) and began setting up the participation game I was running that night. I had GM'd a few games back in high school but since GMs get free admission to the show and Chris was looking for someone to showcase the new Skirmish Sangin Platoon Plus rules (see my January 10 post), I was more than happy to volunteer.

The rules were originally set for release at the convention, but as I had said in some earlier posts, the preliminary playtests made us realize that the rules needed some more polishing before it would be ready for publication, so Colin (the author), Chris (the North American distributor), and myself decided that the participation games at Cold Wars would make for great blind playtests and would hopefully provide great feedback and constructive criticism for the game's development moving forward.

Taliban troops take cover behind a wall

The set up for Friday night's playtest


To my delight, both games had all their participant slots filled and I even took in a walk-up participant in each as well. Friday night's session began with a quick 10-minute intro to the rules and we jumped right in. I gave each side a basic platoon and the scenario up as a generic meeting engagement. This would be the quick of the two demos, as the British players spread their forces rather thin and kept allowing their fireteams to be caught in the open, resulting in horrendous casualties. After about an hour and a quarter of play, the British platoon was below half strength, while the insurgents had suffered only one casualty, so we called the game. Since there was still a great deal of time left in the time slot, the players agreed to stay on for a discussion of the rules - what they liked, what could be improved, and how we could make those changes. The consensus was that the biggest weaknesses seemed to be in the spotting mechanism and in the cover bonuses. We also discussed how the rules could better represent assymetrical warfare (for this we received some excellent invites from a convention attendee who had stopped and join the conversation and who had happened to work at ISAF air command in Kabul for the RCAF in 2008). The players agreed that the foundations of a good game were present, but it definitely needs some polishing.

Saturday afternoon's field of battle

A Taliban militia squad takes cover near a while, while the PKM team is shot up by British UGL rounds

Keeping these suggestions in mind. I made a few tweaks to the draft as it stands and prepped for the next day's game. I arrived at the show on Saturday morning, where I was joined by my father, who drove down from his place about an hour and a half away. After taking a walk through the vendor area and morning flea market, we took in a quick lunch and started prepping my second playtest. Set-up went much faster with a second set of hands (Thanks, dad!). This time around we had 7 players, most of whom were new to modern era gaming. Besides the minor tweaks to the rules, I changed the deployment a little bit from the previous evening's contest. Instead of a general meeting engagement, this time, I predeployed most of the Taliban squads to represent an ambush on the patrol. Overall, this game ran much smoother than Friday's - partly due to my edits and partly, I'm sure, to my growing familiarity with the rules. The players led their troops right into the fray and, for a time, it seemed that the game could go either way, but a few critical rolls went in the favor of the British troops (the British players used their support weapons with great success). After about two hours, it became apparent that the Taliban platoon would not be able to hold against the British and so we called the game a little early. We spent a few minutes afterward going over some of the points the other playtest group brought up and a few more suggestions were made for improvements.

Overall, it was another great show. Though I did not take part in a participation game as a player, the two games I hosted were well received and provided a lot of useful insight for improving the next draft of Platoon Plus. I also made out pretty well in the vendor hall and flea markets. I picked up some paint and flocking to spruce up my new 4Ground kits (more on that later), finally got the books and tokens from the Disposable Heroes 2 Kickstarter, and exchanged the "Mixed Ground" mat from Cigar Box mats for the plush version of their "New Grassland" mat. The colors of the new mat look march more realistic than the one I had picked up at Fall In and the plush pile of the mat give the ground covering some realistic depth. I also snagged an Army Painter Target Lock Laser Line, which will put an end to all line of sight debates in my future games. My favorite purchase, however, were some handmade trees and smoke markers I picked up in the flea market that were made by an 11 year-old girl who manning her table with her parents. The trees are well-proportioned and aren't made of the typical model railroad flock that falls apart all over the table. The smoke markers are definitely a much better fit for my 20mm vehicles than the larger ones I picked up a while back on Ebay. She was also selling baggies of homemade cookies! I was so pleased with the terrain and baked goods I bought Saturday morning that I went back in the afternoon session to pick up some more, but the family was gone. Maybe next time!

My new trees on the plush New Grassland mat from Cigar Box

The flame/smoke markers from the same producer


Tuesday, January 31, 2017

Plastcraft Games EWAR 15mm ColorED Review

When I started gathering terrain together for my CoC Normandy projects, I faced a big decision to make regarding the buildings to choose for my tabletop. While there are loads of options for 28mm gamers and, thanks especially to flames of war, a ton of great 15mm options (including pre-painted ones), my choice in using 20mm figures found me a bit limited. Sure, there are plenty of HO scale model railroad buildings that could fit the bill, but at least from what's available in the States, these looked better suited for a 1950s suburb than a 1940s French battlefield. Both Sarissa and Charlie Foxtrot offer 20mm ranges, but they are quite limited and I wasn't keen on painting the buildings myself (at least not yet, anyway). 4Ground has some nice agricultural buildings in the scale, but not much in terms of residential buildings, which I knew I was going to need. Then I heard about Plastcraft's EWAR ColorED range of printed PVC buildings and my curiosity was picqued.

I had seen the company mentioned on a few forums and on the Plastcraft website, but the the only reviews I could were for their other ColorED ranges or for their unpainted WWII models. Thankfully a number of participation games at Fall In this past November featured the 28mm EWAR ColorED buildings and I was hooked. The detail on the models was fantastic, they seemed rather easy to put together, and the price seemed extremely reasonable for the quality, so when I found out that my boss at the bookstore could get them through his wargame distributor, I promptly ordered the 15-20mm Building set, an additional two-storey building, and the Saint-Mère-Èglise church (the latter was not required for either of the two CoC campaigns I am putting together, but just looked cool!).

I had to wait a few weeks to get all the models in from the distributor, but they all came before Christmas and thankfully my fiancée was gracious enough to help me put some of them together one evening.

Here a some pics of the finished products:

The "Two-Storey Buidling"

Second and third floor interior of the same

The ruins/base for the "Two-Storey Building"

The "Semi-Detached Building"

"Semi Detached" interior. I love that the two buildings have markedly different floors 

The "Town House" and its base

The Saint-Mère-Èglise church


Stained glass windows

Bellfry interior


Lovely details inside the church
The buildings arrive packed flat in cardboard boxes (the 4-building set came in one box) and most of the parts were rubber-baneded together. Some of the parts in the big set had become separated in shipping, so I had spend a little time sorting those pieces out, but it wasn't much of a problem. Regrettably, the large window for the grocery was missing (I can just pretend it's been blown out), but otherwise, all the kits were complete. Unlike the 4Ground kits, printed directions are not included, but the instruction sheets can be found on the company's website.

In terms of actual assembly, these models are pretty straight forward. Since they require superglue and not the PVA of MDF kits, they go together pretty quickly. The downside of this, however, is that these buildings are less forgiving when it comes to making adjustments. A few pieces, especially some of the roof tiles, needed to be forced into a dry fit before gluing to ensure they would sit properly, but for the most part the pieces assembled easily. It took me a few tries (and very careful prying) to adjust the doors to fit over the ruins base and stoop. Though the first building took me about an hour to complete (it took a while to work up a system for installing the windows), I completed the last small building in about 20-25 minutes and did the whole church in about 45. No waiting for interior walls to dry, no need for rubber bands or clothespins to hold everything together.

As you can see in the photos, the printed exteriors are full color and are wonderfully illustrated and the interior floors are exceptionally detailed. The windows add a nice touch to the realism (especially with the church).

They are styled as "15-20mm" which I assumed would mean they would be a bit on the small side for my 20mm figures, and they are, but not by much. This is also partly due to my preferred 20mm figures being on the bulkier side of the spectrum. Since CoC's ground scale is truly fit for 15mm anyway, I'm not too concerned. For anyone using 15mm  or the popular brands of 20mm, these pieces should fit in with the miniatures just fine.
A 20mm modern British soldier from Elheim Miniatures outside the "Grocery"

The same figure inside the "Two-Storey House"


Outside the church (and a bit out of scale)
So for my residential building needs, I think I made the right choice. Since Plastcraft has yet to release any farm buildings for the EWAR range, I've opted to go with 4Ground for those (review to follow), but for my Norman villages, these will do nicely. I've included photos of all 5 buildings from the 15mm-20mm range. The same structures (with some variations in color) are available in their 28mm range, which also includes a warehouse model. For anyone looking for an affordable, pre-painted  scenery option for Chain of Command, Bolt Action, Flames of War, or any other WWII game, scenery option for Chain of Command, Bolt Action, Flames of War, or any other WWII game, I can't recommend these kits enough