Tuesday, January 31, 2017

Plastcraft Games EWAR 15mm ColorED Review

When I started gathering terrain together for my CoC Normandy projects, I faced a big decision to make regarding the buildings to choose for my tabletop. While there are loads of options for 28mm gamers and, thanks especially to flames of war, a ton of great 15mm options (including pre-painted ones), my choice in using 20mm figures found me a bit limited. Sure, there are plenty of HO scale model railroad buildings that could fit the bill, but at least from what's available in the States, these looked better suited for a 1950s suburb than a 1940s French battlefield. Both Sarissa and Charlie Foxtrot offer 20mm ranges, but they are quite limited and I wasn't keen on painting the buildings myself (at least not yet, anyway). 4Ground has some nice agricultural buildings in the scale, but not much in terms of residential buildings, which I knew I was going to need. Then I heard about Plastcraft's EWAR ColorED range of printed PVC buildings and my curiosity was picqued.

I had seen the company mentioned on a few forums and on the Plastcraft website, but the the only reviews I could were for their other ColorED ranges or for their unpainted WWII models. Thankfully a number of participation games at Fall In this past November featured the 28mm EWAR ColorED buildings and I was hooked. The detail on the models was fantastic, they seemed rather easy to put together, and the price seemed extremely reasonable for the quality, so when I found out that my boss at the bookstore could get them through his wargame distributor, I promptly ordered the 15-20mm Building set, an additional two-storey building, and the Saint-Mère-Èglise church (the latter was not required for either of the two CoC campaigns I am putting together, but just looked cool!).

I had to wait a few weeks to get all the models in from the distributor, but they all came before Christmas and thankfully my fiancée was gracious enough to help me put some of them together one evening.

Here a some pics of the finished products:

The "Two-Storey Buidling"

Second and third floor interior of the same

The ruins/base for the "Two-Storey Building"

The "Semi-Detached Building"

"Semi Detached" interior. I love that the two buildings have markedly different floors 

The "Town House" and its base

The Saint-Mère-Èglise church


Stained glass windows

Bellfry interior


Lovely details inside the church
The buildings arrive packed flat in cardboard boxes (the 4-building set came in one box) and most of the parts were rubber-baneded together. Some of the parts in the big set had become separated in shipping, so I had spend a little time sorting those pieces out, but it wasn't much of a problem. Regrettably, the large window for the grocery was missing (I can just pretend it's been blown out), but otherwise, all the kits were complete. Unlike the 4Ground kits, printed directions are not included, but the instruction sheets can be found on the company's website.

In terms of actual assembly, these models are pretty straight forward. Since they require superglue and not the PVA of MDF kits, they go together pretty quickly. The downside of this, however, is that these buildings are less forgiving when it comes to making adjustments. A few pieces, especially some of the roof tiles, needed to be forced into a dry fit before gluing to ensure they would sit properly, but for the most part the pieces assembled easily. It took me a few tries (and very careful prying) to adjust the doors to fit over the ruins base and stoop. Though the first building took me about an hour to complete (it took a while to work up a system for installing the windows), I completed the last small building in about 20-25 minutes and did the whole church in about 45. No waiting for interior walls to dry, no need for rubber bands or clothespins to hold everything together.

As you can see in the photos, the printed exteriors are full color and are wonderfully illustrated and the interior floors are exceptionally detailed. The windows add a nice touch to the realism (especially with the church).

They are styled as "15-20mm" which I assumed would mean they would be a bit on the small side for my 20mm figures, and they are, but not by much. This is also partly due to my preferred 20mm figures being on the bulkier side of the spectrum. Since CoC's ground scale is truly fit for 15mm anyway, I'm not too concerned. For anyone using 15mm  or the popular brands of 20mm, these pieces should fit in with the miniatures just fine.
A 20mm modern British soldier from Elheim Miniatures outside the "Grocery"

The same figure inside the "Two-Storey House"


Outside the church (and a bit out of scale)
So for my residential building needs, I think I made the right choice. Since Plastcraft has yet to release any farm buildings for the EWAR range, I've opted to go with 4Ground for those (review to follow), but for my Norman villages, these will do nicely. I've included photos of all 5 buildings from the 15mm-20mm range. The same structures (with some variations in color) are available in their 28mm range, which also includes a warehouse model. For anyone looking for an affordable, pre-painted  scenery option for Chain of Command, Bolt Action, Flames of War, or any other WWII game, scenery option for Chain of Command, Bolt Action, Flames of War, or any other WWII game, I can't recommend these kits enough

Tuesday, January 10, 2017

New Year's Gaming

As I've mentioned previously, I currently work part-time at military history bookstore in downtown Gettysburg, PA. My boss's son is visiting while on a break from school, and since he's an aspiring wargamer, I offered to host a game for them. One of his favorites is Force on Force, so I decided to blow the dust of my modern Brits and Taliban fighters for the occasion.

I chose to run Scenario 16 from the Enduring Freedom book, "The Battle of Danaweh II." Modeled after a pitched battle between Marines and Taliban forces in 2009, this engagement presents the ISAF player(s) with three objectives to complete. First, they must come to the aid of a wounded comrade who has been caught in the open by enemy fire. Second, they must evacuate said injured marine back to a designated HLZ to be evacuated from the battlefield. Finally, their EOD team must safely dismantle an IED on the opposite corner of the table. All tall order indeed, especially since the Taliban forces in this scenario are rated as regulars and have all kinds of nasty support weapons they can bring to bear. Though the scenario is based off a USMC action, I don't have enough American figures to field the complete force, so my Brits had to stand in for their Yank comrades!

The ISAF forces cautiously advance to the aid of a wounded leatherneck
The ISAF forces (played by my boss, "Big" Larry, and his son, "Little" Larry) began with some rather cautious movements, but took care of the first few Taliban ambushes without incident. Big Larry's squad got to the wounded marine quickly and began working their way back toward the HLZ, dispatching 2 large Taliban groups and a PKM team in short order. During this strategic withdrawal, a series of unfortunate die rolls meant that several of my Taliban groups failed to spring their ambushes on the unsuspecting ISAF troops, whose own miserable rolls on spot checks meant that the lurking insurgents went unnoticed. Once their whereabouts were successfully pinpointed, not even a sudden windstorm (brought about by fog of war card), which eliminated the Americans' advantage in optimum range firing, could save the Taliban forces from the withering fire laid down by the marine squad and its support weapons.

A horde of Taliban fighters in an alleyway overlooking the IED.

Meanwhile, Little Larry's men advanced with no opposition until they got just within sight of the IED, when a massive Taliban group ambushed the fire team and machine gun team escorting the EOD men. A number of casualties were taken, but the bomb disposable tech was able to reach the the IED unscathed. Little Larry rolled the TQ check to defuse the device, but failed, causing it to explode. Remarkably, neither the disposal tech nor anyone in his team were harmed by the blast. With their objective taken care of and more Taliban reinforcements rushing to the group in that intersection, Little Larry made the wise choice to begin pulling his squad back and consolidating with the rest of the platoon at the HLZ.

This decision brought an end to Turn 3, and we actually decided to call the game early. We had started later in the evening than we had planned, so it was getting close to midnight. Also, near the end of the turn, a fog of war card was drawn that gave the ISAF forces a UAV which would fly over the battlefield and help reveal hidden insurgent units. Seeing as ambushes from the two or three groups I still had hidden were my only hope in inflicting more casualties (it was pretty clear at this point that Big Larry was going to successfully get the wounded marine to the LZ), this really ended any chance I had at a significant victory. Overall - indecisive, but advantage Coalition forces.

Less than 48 hours, I hosted a second game for my father. My friends at Dishdash Games and Phalanx Consortium (their US distributors) are premiering their new platoon plus-level modern ruleset at Cold Wars in March and I've agreed to run two demonstration games at the show. I was given a draft of the rules a few weeks back and since my dad's factory was on shutdown this week, he offered to come down and be the opposition for my playtest.

The draft didn't have much guidance in terms of force composition or scenario design, but I figured I'd try some different things in the playtest and see what worked the best for the convention. I must confess that I've never considered myself very good at scenario or map design, but I was pretty pleased with what I threw out on the table:


After giving my father a brief overview of the key mechanics of the rules, we jumped right in. Unfortunately, the draft rules I had were very much a rough draft and though we were able to push our way through a full game turn, some confusing sections and missing parts of the rules made it a frustrating playtest, but that is what playtesting is all about. In the aftermath of this run some conversations with the game designer have already led to a number of clarifications and additions. I look forward to the next test!

The next evening, the Larries came over once again for another Force on Force game. This time, I ran one of my go-to scenarios from the Enduring Freedom book, Scenario 10 - "Sangin Ambush." I've run this game with friends, clubs, and at shows, and have seen completely different results each time, so I was anxious to see how it turned out.

The dramatic opening to the scenario
The scenario begins with an RPG strike to a British vehicle column, resulting in the brewing up of a Bv10 Viking. The British players are then tasked with rescuing the crew and passengers in the burning vehicle (and either putting them safely in another vehicle or to a casualty clearing point), "winning the firefight," and extricating their over-strength platoon from the ambush.

Unfortunately for the Brits, the situation immediately went from bad to worse as before their first vehicle could move, a Taliban DShK team opened up on the landrover, reducing its movement by half for the remainder of the game and incapacitating the entire crew. Though returning fire sent the insurgent fleeing from their machine gun, they had certainly earned their pay for the day. With two vehicles in need of first aid checks, the British began dividing their forces to deal with the two crises. A number of Taliban ambushes were sprung, resulting in more first aid checks, but these new threats were quickly dealt with, largely due to effective fire from the Vikings' .30 cals.

A well-aimed burst from a Taliban DShK team wreaks havoc on a Land Rover WMIK
The next turn saw nearly all the British casualties come out of their first aid check OK or with light wounds (only the driver of the destroyed Viking was killed). The next turn proceeded much the same as the first. A round of fire from some Taliban RPGs incapacitated all but the driver in the other Land Rover, forcing one of Vikings to drive up to their aid. By this time, the fireteams in the unharmed Vikings had disembarked and were beginning to clean up the Taliban resistance. A number of insurgent leaders and support weapons were neutralized, though a fog of war card gave one of the insurgent groups a cover boost and made them a little harder to move.

The British infantry rallies around two of the Vikings

Near the end of Turn 2, a British fire team arrived at the rear cab of the damaged Viking, setting up a very import first aid check at the start of the new turn. Miraculously, all six of the cabin's passengers well were pulled out with either no or light wounds. More firefighters followed and the ISAF forces seriously whittled down the insurgent resistance. By this point, all but one of the hidden Taliban groups had been located and all but one of those had lost their leaders. Things were not looking well for my irregulars. By the time we reached the end of the Turn 3, it was getting clear that the Taliban forces would not hold much longer, even if my remaining reinforcement roles were exceptional. A brief look at the scenario's victory conditions, however, showed that though the British had rescued the men from the destroyed Viking and would probably evacuate the force from the table by the end of Turn 8, they had suffered enough killed and seriously wounded that a successful result for the ISAF forces was mathematically impossible. A Pyrrhic victory for my Taliban fighters!

After going quite some time without a miniatures game, three games in a week was nice treat, though I am looking forward to having more gaming options beyond my modern and SAGA stuff. Only two more months until I pick up my painted WWII minis at Cold Wars!

Friday, December 16, 2016

Chain of Command Bits and Bobs Review (Care of Monty's Wargaming World)

Not too much to update regarding my Scottish Corridor/Chain of Command project, but I did want to give a little bit of the spotlight to some accessories I've recently purchased from Richard Morrill in the UK (or "Monty" as he is known among fellow Lardies).

As with any miniatures game, a necessary amount of markers and tokens are needed to track information in Chain of Command. While most gamers make these themselves, I decided to look online for tokens and markers which would look much better than anything I could produce.

Richard is one of the big names in Chain of Command (he authored the excellent Operation Winter Storm campaign book) and it was no surprise that when I checked out his website of hand-made gaming accessories, that I found the pieces I needed.

The first were patrol markers. The "patrol phase," sort of a game within a game, is one of the unique features of the ruleset. Before the shooting begins, the search for the enemy's whereabouts by scouting patrols is played out by the two sides maneuvering circular counters around the table in an effort to secure the best positions for their platoons to "jump off" into combat. While Too Fat Lardies provides free patrol markers that can be printed out, I wanted something a little sturdier. Monty's website advertises that customers can order generic markers or unit-specific ones. To add a little flair to the campaign, I decided to order markers for the four divisions primarily involved in the fray. On the British side of things, this meant the 11th Armoured Division (whose 3rd Battalion, Monmouthshire Regiment will be covering the Allies' right flank in the campaign) and the 15th (Scottish) Division, who gave the name to the "Scottish Corridor." On the German side, I went with the divisions from which the bulk of the two kampfgruppes were formed: 1st SS Panzer Division "Leibstandarte Adolf Hitler" (the parent unit of KG Frey) and 2nd SS Panzer Division "Das Reich". Specifics of the patrol markers' construction were not given on the website, but they wound up being poker chips with the appropriate unit insignia printed on paper and affixed to the chip. Richard even ensured that the 11th Armoured's distinctive yellow flash was mounted on a chip of the same color!

Patrol makers for the 1st SS Panzer Division (top left), 2nd SS Panzer Division (top right), 11th Armoured (bottom left), and 15th (Scottish) Division (bottom right)
The sets of patrol markers also come with a set of jump off points (which are placed after the patrol phase ends at the start of the game proper). I've seen a number of gamers make their own out of barrels, ammo crates, and other bits of military supplies/stowage, but, personally, I think those items look a bit out of place in the "no man's land" between the two armies and so was looking for something different. Richard offers two options: non-scenic, which are just smaller versions of the patrol markers, and scenic, which are distinctive terrain bases - available in temperate, desert, and winter versions. Since my first campaign will be set in the Normandy campaign during the summer of '44, I chose to order two temperate sets and was pleased with the results.


The scenic bases have a mix of features. Two include rather unfortunate cows, a few have rather distinctive logs, and the rest either have large clumps of grass or larger rocks. The jumping off points are well made and will stand out as noticeable features on my battlefields.


Lastly were the shock markers. While I've seen some people using acrylic tokens or small dials to track the amount of shock their units take in the game, I decided to go with Monty's dice bases, which I figured would look the least obtrusive (and a little less "gamey"). In the games of Chain of Command and Sharp Practice that I've played before, we used some microdice I had lying around from the old Pirates of the Spanish Main game but they were almost too small to handle, so I ordered a few packs of the bases offered with 10mm dice, which seemed a little more manageable. The bases are nicely flocked and are magnetic, too, which will help with storage (they'll be able to go right into the storage trays with my miniatures).

While there was admittedly nothing really flashy about these game markers, they're all necessary bits for conducting a game of Chain of Command and will look great on the table. Richard Morrill makes some excellent products and his customer service, both in his communication and willingness to bundle products and get the best deal on shipping, are second to none! I'd highly recommend checking out his page at Monty's Wargaming World (http://www.montyswargamingworld.co.uk/gaming-accessories.html).

Saturday, December 3, 2016

Britannia 20mm Review

My ongoing Chain of Command project took a big step forward a few weeks ago when I finally ordered over my miniatures. When I had first planned the campaign, I considered using 28mm figures, but quickly realized that the miniatures, vehicles, and scenery would be a little out of my price range at the moment and would be a bit cramped on my 6' x 4' table. Then I thought about 15mm, which would match the ground scale of the rules, but decided that it would be a little too small for what I imagined for a 1:1 scale skirmish game. That led to me deciding on 20mm, which would serve as a happy, and affordable, medium.

Then came the decision about which manufacturer to use. The World War II range from AB Figures is probably the best on the market, but didn't have all of the support options I need and is sold in specific packs that would have meant a lot of extra lead sitting around. While there are many other manufacturers who make both plastic and metal 20mm ranges, I find most of their figures to be rather spindly. I've always liked my miniatures with some chunkiness to their proportions (probably a throwback to my first miniatures game, Alternative Armies' Flintloque) and so I turned to Britannia Miniatures (available from Grubby Tanks). I first encountered the range when I picked up a copy of the Rapid Fire World War II rules years ago and really liked the bulky, somewhat-cartoony look of the sculpts. They are for a game, after all.

Having settled on a range, I took my copy of the Scottish Corridor pint-sized campaign booklet (and the Operation Martlet one for good measure) and made an extensive shopping list. The Allied force is comprised of a standard British infantry platoon, with a variety of supports from a sniper to a anti-tank gun and crew. The Tommies are supported by Stuart, Sherman (standard and Firefly), and Churchill tanks. Their German opposition is made up of a Waffen SS panzergrenadier platoon with its fair share of supports (forward observer, infantry gun, anti-tank gun, etc.), backed up by a Panzer III, Panzer IVs, a Panther, and a Tiger.

An advantage of ordering from Grubby Tansk is that all of the Britannia's WWII vehicles are available painted. I also found out, after the order, that the figures are also available painted for very competitive rates. I opted to have the miniatures painted by my go-to painter friend, but since the vehicles were only 2.00 GBP more painted, I decided to order them with that option. Though this added a few weeks to my wait time, the end result was worth it.

My new Sherman and one of the Churchills (with 75mm gun, though 2 and 6 pdrs are also available)

Panzer III, Panzer IV, and Panther
The vehicles were expertly painted and, for the most part, tabletop ready. Andy Grubb (the proprietor of Grubby Tanks, and the painter) contacted me a number of times throughout the painting process to ask about the paint and camouflage schemes I wanted and which gun barrels to use on the models that included options for the armaments. There were a few spots of paint that needed some touching up and the turret of my Stuart had a small piece of the turret chipped of (though nothing a little dab of super glue couldn't fix), but considering that the majority of the twelve models had made their way across the Atlantic in excellent condition, I was rather pleased. Though tank nuts may appreciate the crisp, accurate details provided by plastic model kits, these resin models are more than worthy to be pushed around a gaming table. Andy even included an extra Panzer IV with the order...a gesture I greatly appreciated.


British rifleman, Sten gunner, rifleman, and bagpiper

Another shot of a sampling of Brits
Waffen SS rifleman, MG42 team, MP40 gunner (with potato masher grenade), and STG44 gunner


Then there were the figures...over 130 of them and 4 guns. Since I already own some Britannia WWII figures and a fair number from their modern Afghanistan range, there weren't too many surprises with these. As previously stated, the miniatures have rather bulky/chunkier proportions, but means they are by and large sturdy little models. There was some flash from the casting process present, especially along the bases (you can see some of this in the above photo with the felt), but it was comparable to what is seen on figures from most manufactures. The weapons and limbers were ramrod straight. I had ordered a wide range of poses and was pleased with the variety and realism of the pieces. While some manufacturers produce figures in unnatural poses or one that would never be assumed if following the manual (and common sense), the Britannia figures all appeared as if they were out on patrol or taking enemy fire. I was confident that with this animation, both of my platoons will be brimming with character. I was also extremely please with the details on the figures. For instance, though British infantryman were officially issued with a cumbersome entrenching tool, large t-handled shovels began filtering their way into the sections by D-Day (and one or two pick axes as well) and most of these battle hardened soldiers are kitted out with these rather noticeable engineering implements. A little bit of research and realism goes a long way with me.

Overall, I was very pleased with the quality of my miniatures and painted vehicles from Britannia/Grubby Tanks. Andy Grubb is an excellent retailer and his customer service is as best as they come in the hobby. The prices for the figures (0.65 GBP per miniature) and vehicles were extremely affordable and the shipping across the pond reasonable as well (20% of the order). It was a delight doing business with Grubby Tanks and I certainly will again in the future. I'd highly recommend the figure range and the company.

For now, the minis and guns are in the possession of my favorite painter and I'll be picking them up the next time our paths cross at Cold Wars this March, so stay tuned!

Friday, November 11, 2016

Fall In! 2016

One of the great things about being back on the East Coast, especially the Mid-Atlantic region, is the proximity of the annual conventions run by the Historical Miniature Gaming Society-East. My father and I used to attend these shows regularly when I was growing up (largely for me to play games and buy miniatures and for him to buy second-hand books in the flea market) and so I was eager to drive over to nearby Lancaster, PA this past weekend to attend the group's autumn show, Fall In!

I arrived just before 9 AM on Friday, which provided ample time to pick up my badges from the registration desk and get the lay of the land. Then, it was off to my first game at 10 AM. The conventions theme was "Poland at War", and while there were numerous opportunities to lead Renaissance-era winged hussars or Napoleon's czapka-wearing Vistula Legion into battle, I opted for something a little more familiar - Poles in Normandy.


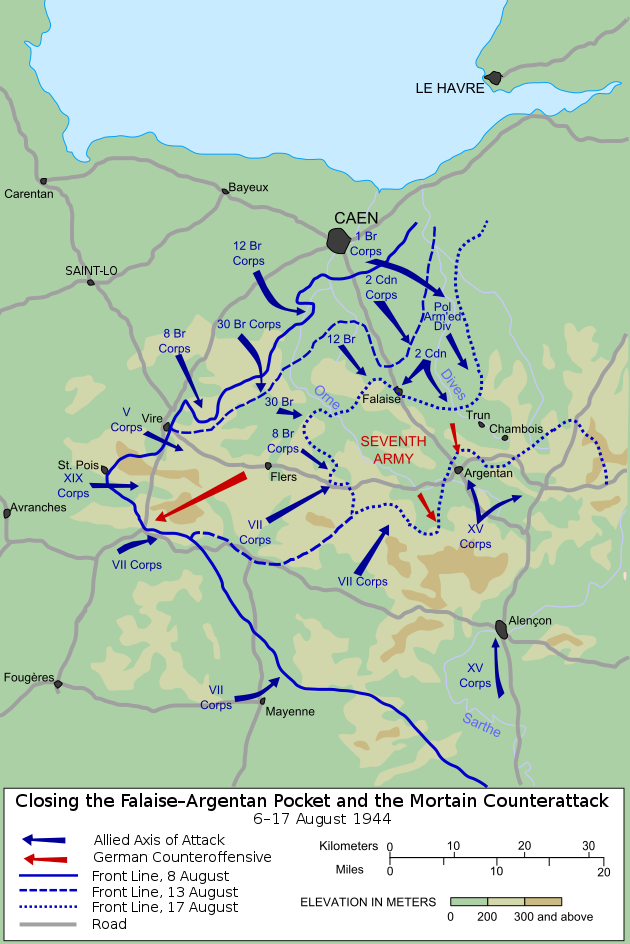
The story of the 1st Polish Armoured Division at Falaise is the stuff of legend (for more see John Keegan, Six Armies in Normandy). Part of the Free Polish Forces who fought alongside the Western allies (comprised mostly of Polish soldiers who had escaped their country in 1939), these men were flung into battle with their American and British equipment in the latter stages of the Normandy campaign. The Germans were on the run and with the British/Canadian/Polish 21st Army Group advancing from the north and Patton's 3rd Army moving swiftly up from the south, the hope was the complete destruction of the German 7th Army. Though a link between the two Allied advance occurred at the town of Chambois, the Germans fought tenaciously to break free. At Mount Ormel, the Poles were attacked by remnants of 20 German divisions (many of them armored) but held firm. Though roughly 100,000 escaped the "Falaise Pocket", more than 50,000 became prisoners and hundreds of tanks and other vehicles were destroyed.

Unfortunately for me, this scenario would not be replicating the epic fight on Hill 262 where the Poles covered themselves in glory, but rather the meeting engagement between the German 2nd Panzer Division and the Poles' reconnaissance regiment, the 10th Mounted Rifles (equipped with British-made Cromwell tanks). We were using Brazen Chariots WWII Tank Battle Rules, which I had never played, but thankfully the gamemaster, Adam, was the author of the rules, so picking up the key points was not a problem. Adam also happens to live on the other side of Gettysburg, and we've already made plans to meet up for a game session.

My Cromwell tanks prepare to advance
Our advance (my troop are three tanks to the right) just before it bogged down and came under fire

The objective for me and my Polish comrades was simple: drive across the field and get 3 of our Cromwells across the enemy's edge of the table. Sadly, it was not to be as simple as we hoped. Our advance was quickly broken up by a village and rough terrain as we reached the middle of the table and it was about that point that we began taking withering fire from the German Panzer IVs. My tanks fired back one (through two small hedgerows) but did not penetrate the looming enemy tanks. In quick succession two of my crews were quickly knocked unconscious, which made them even more sitting ducks than they had been already. That left one surviving Cromwell for me, which soon found itself outnumbered 7-1. Though the crew passed a morale check on a 20, and thus made it heroic, their gun could simply not match the power of the German weaponry. Before I knew it, all three of my tanks were burning in the fields of France. Some of the other Polish troops managed a little better for a time and we returned the favor by destroying a number of panzers, but it became apparent that we would not reach our objective without help and that our line was in trouble. Thankfully, the Germans had wasted quite a bit of time towards getting to the objective (our edge) and when the time slot for the game ended at 1 PM, Adam announced that we were about where the fighting was historically, just as Allied aircraft were about to arrive to reduce the menacing German tanks to burning hulks. A Pyrrhic victory for the Poles, but as I mentioned earlier, greater glory awaited them down the road.

By the time the game finished up, the vendor hall was open, so I made my way over there and moseyed around a bit. Since I was coming Saturday, I figured I'd just use Friday to plan my purchases for the show. While working my way through the stands it was also nice to catch up with some old friends, including Chris and Steph Bennett of the Phalanx Consortium (https://www.facebook.com/thephalanxconsortium/?fref=ts) and Lon Weiss of Brigade Games (http://brigadegames.3dcartstores.com/). After working through the vendor hall, I made a quick visit to the flea market and then took a casual stroll through the gaming areas. This was the first wargames convention I've ever attended without friends or my dad, which allowed me to wander as I pleased and take as much time in the various areas of the show.

Some attendees getting into the spirit of things in their French-Indochina War game

Some French air support causing havoc for the Viet Minh
When the vendor area closed, I met up with Chris, Steph, and their daughter again for dinner. When I lived in Williamsburg, Chris was the fearless leader of our gaming group and the Bennetts frequently  opened the home, and kitchen, to me as a welcome escape from campus (and, later, my bachelor pad). Chris is also the artistic force behind all my painted scenery and miniatures. During my three years out in California, I only saw Chris twice and Steph once, so catching up with these dear friends was a great way to end the first day of the convention.

The next morning, I left Hanover at the same time and arrived at the show just in time to meet up with my father who had driven down from my hometown of Bethlehem. My dad attended my first wargames show with me (Fall In! 2001) and had tagged along to many more during my grade school and college years. We hadn't been to a show together since 2012 and he was really looking forward to this one (I should note that he isn't much of a gamer, but really enjoys the good deals on books that can be found at the conventions).

We started our day in the vendor area, where I began working through my wishlist. I picked up a new carrying case and storage trays for my new World War II minis from Dave's Baggage Train (http://www.davesbaggagetrain.com/) and the Mixed Ground gaming mat from Cigar Box Battle Store (http://cigarboxbattlestore.bigcartel.com/).  Over in the dealer hall, I picked up some really well-made trees (a wargamer can never have enough of them) and a copy of Lord of the Rings Risk, which I figured I could convince Becca to play.

Since my father isn't always one for in-depth miniatures games, we had not signed up for a formal game, but he had indicated that he was interested in finding some kind of demo to play, so we went back to the Brigade Games stand in the vendor hall, where we played through a turn of the forthcoming World War II skirmish rules, Disposable Heroes 2. I had played the first version of DH at HMGS shows year ago (back when my limited budget meant even a platoon-level game was well out of my price range), and remembered that though I generally liked them, some parts of the rules felt a little clunky (especially regarding vehicles). In any case, our brief playthrough with the author showed how a lot has been streamlined and the game has a very nice flow to it.

One of my MG34 teams taking cover from a shower of French grenades and light machine gun fire

Our scenario was a probe/attack on an objective engagement during the German invasion of France. I had a platoon of German grenadiers, while my dad took command of a basic French infantry platoon defending a small village crossroads. The first few activations saw a pretty vicious duel between my light mortar and my father's VB grenade launchers which claimed half of my platoon HQ, so I brought up a infantry squad in support, which soon began exchanging fire with a French LMG team in a nearby house. Though I was able to force the enemy at the crossroads to occasionally put their heads down, I really was unable to inflict any casualties. Realizing I'd have to find another way to take my objective, I began ordering one of my squads to advance through an orchard on my dad's flank. He soon detected what was going on and brought up a squad of his own to check my attack, but a hailstorm of lead from my section's snap fire sent the Frenchmen running. As our demo turn was coming to a close, my advancing grenadiers seized one of the objectives. A quick, but stress-free game that we picked up after a few goes. My father even said how much he enjoyed it, which says a lot about the game, and how he would enjoy playing it at my house if I picked up the rules.

My flanking section on the way to victory

A rather stunning ACW game we passed
Some Polish winged hussars in a theme game
British gliders feature in a Market-Garden-themed game
A stroll through the tournament section revealed the most creative use of an onion saver I've ever seen!

After our game we strolled through the gaming area and eventually decided to take over a vacant table in the ballroom for a pick-up game of SAGA, which though I have played for years my dad had never tried. Since we set up with a much deeper table than I typically use for the game and were a bit stretched for time, we modified the movement distances to allow our troops to get into combat sooner. My father's Scots and my Anglo-Danes hurled themselves into the fray and by Turn 3, we were in the thick of some intense melees. The first scrap saw a unit of my hearthguard suffer at the excellent dice rolling on behalf of my father's warriors. The balance quickly swung my way the next turn, when my warlord and a group of warriors inflicted serious casualties on a group of Scottish warriors and my Danish axe-armed hearthguard made short work of a unit of Scottish warriors. At the end of the turn, my dad realized that he had to get on the road, so we called it and figured out the my old man beat me by a score of 7 to 6.5. Beginners luck is a real thing!


I walked around a bit more, heading back to the dealer hall to say my goodbyes, and then it was time to hop back in the car and go home. All in all, it was a great little show and I look forward to Cold Wars this March!

Tuesday, October 18, 2016

Antietam Excursion

Since I'm currently working two part-time, retail jobs (while on the hunt for a full-time gig), having Saturdays off is a very rare occurrence. When I found out that I didn't have to work this past Saturday, Becca and I decided to make the most of it and take a day trip. Living in south -central Pennsylvania means that we have large number of museums and historic sites to choose from for these adventures, but for this one we opted for a visit to Antietam National Battlefield in Sharpsburg, Maryland. Though I had been to the park twice before (the most recent time in 2008), this would be Becca's first visit and since it was only an hour and a half away, we figured we'd have plenty of time to make the most of the park's offerings.


After our pleasant drive through the Catoctin Mountain Park, we arrived at the visitor center just in time to see the 10:00 showing of the park's orientation film (narrated by none other than Darth Vader/Mufasa himself, James Earl Jones). While not the best museum film I've ever seen, it did a good job of laying out the context of the battle, its key moments, and its impact on the war and the ending of slavery. After the film, we walked through the visitor center's small museum (which was much smaller than I remembered, only taking up two rooms). As the summer tourist season was over, there was not much being offered in the form of interpretive programs that day, so we decided to start our tour of the battlefield using the Travel Brains Antietam Expedition Guide I had purchased a few years ago.

The Dunker Church - The Dunkers were a pacifist, German Anabaptist sect, but their quaint little plot witnessed some of the worst carnage of the war.
The monument to Clara Barton, who served a volunteer nurse during the war and, later, founded the American Red Cross. The cross on the monument is made from bricks from her birthplace.
This trusty tour CD and companion guide follows the park's auto tour route providing both details of the fighting and human interest pieces about the participants. We visited the famed Dunker Church, the North, East, and West Woods, and the famed Miller Cornfield. By the time we finished up our study of the fighting on the morning of September 17, 1862, we were both pretty hungry and so, at the recommendation of one of the rangers on duty, we went for lunch at the Battleview Market (just a half mile from the visitor center). While this appeared to be a run-of-the-mill convenience store on the outside, it actually contained a nice little deli/grill and convenient seating inside. For anyone visiting the battlefield, I'd highly recommend lunch there.

Becca and me holding our official NPS centennial kerchief at the Burnside Bridge overlook
Burnside's Bridge (currently under refurbishment)

Back on the park grounds, we continued our way through the day's action with a stop at the Sunken Road, the famed "Bloody Lane." Then it was on to Burnside's Bridge over the Antietam Creek. Since the bridge is currently being restored, we weren't able to go over to the side of the creek from which the Union 9th Corps launched its repeated attacks but could get a good view of the terrain from the overlook on the Confederate side. We had decided earlier in the week that in addition to the driving tour, we would take advantage of one of the park's walking trails (and had purchased the trail guides for all 5 in the visitor center gift shop). Since we had already passed on the Cornfield, West Woods, and Sunken Road trails and the Union Advance trail was inaccessible due to the construction, we decided to do the 1.7-mile Final Assault walking trail. This route covers the advance of the 9th Corps once it finally took the bridge in the mid-afternoon and the counterattack by the Confederates of A.P. Hill's Light Division (which arrived on the field just in time after a 17-mile forced march from Harper's Ferry). Though I had a decent knowledge of the events that transpired during the battle, it was not one I have studied a bunch, this phase of the fighting least of all, so this little walk proved to be quite informative, To top it off the weather was almost perfect - brilliantly sunny, not too hot, and a nice breeze.Whenever visiting a battlefield I always like to take some time to walk the ground and this trail, over some hilly, wooded, and slightly rocky terrain made me really appreciate the sacrifices made by the men who, after marching and fighting through most of the day already, found themselves tangled up in what wound up being the bloodiest section of the bloodiest single day battle in American history.

Once we finished in the park, we made a quick detour at the nearby Pry House Field Hospital Museum, a branch of the National Museum of Civil War Medicine in Frederick, Maryland. The house, used as hospital for Union soldiers and officers in the aftermath of the battle, has some excellent displays on Civil War medicine and surgery, as well as the battle's impact on the local community, and provided a poignant reminder of the sufferings of war and a conclusion for our trip. I would highly recommend both the Pry House, and the main museum in Frederick, to anyone interest in the fascinating story of medical development and innovation during the war.

Both Becca and myself had to work on Sunday, but after dinner decided to follow up our battlefield exploration with a game, so I set up the Antietam scenario from the 150th Anniversary edition of  Richard Borg's BattleCry (from the great Command & Colours series of games). Becca took on the role of McClellan, while I took the command of Lee's Army of Northern Virginia. Interestingly, the game played out as almost a mirror opposite of the actual battle. The initial fighting took place on the Confederate right, across Burnside's Bridge, with the tide of battle shifting back and forth until both sides were too bloodied to carry on. Next, the Union forces tried to capture the Sunken Road but were hurled back with heavy losses. Finally a Union attack on the Confederate left had some initial success in the Cornfield, but was finally pushed back after a determined Confederate counterstroke. It was a costly battle for both sides, but my Southerners finished the day with a slight tactical advantage.

The Antietam scenario for BattleCry all set up and ready to go.
Overall, our little excursion provided a much needed escape from work and proved to be both educational and enjoyable. I'd say Becca's first real trip to a Civil War battlefield was a success...she's already talked about going back (and maybe even bringing our dog).

Stay tuned for some upcoming figure reviews, game reports, and a trip to the Fall-In! wargames convention.

Thursday, October 13, 2016

By Way of Introduction

Welcome! I've been meaning to start a hobby and history blog for some time now and after a friend asked if I've been doing any writing since leaving graduate school, I figured now was as good a time as any.

But first, a little about me....

I was born and raised on the East Coast of the United States, where I developed a love of history and wargaming. My very first miniatures game was Alternative Armies' fantasy Napoleonic skirmish game, Flintloque (which combined my love of the Sharpe series and Lord of the Rings). Over the next few years, I picked up a variety of rulesets and figures, but never enough to actually get a new game going. It was also around this time that I started getting into historical reenacting. Though the period between the Seven Years War and the American Civil War was always my favorite era in history, I decided to dive into something different and began portraying a Canadian infantryman in World War II.


Me (on the right) with some comrades at the D-Day Ohio reenactment (2014)
That all changed when I went off university and eventually found myself as part of a regular gaming group, The Williamsburg Legati. Before I knew it, I had a large collection of 20mm modern British and Afghan figures for use with Force on Force and Skirmish Sangin, Anglo-Danes and dark age Scots for SAGA, and some Native Americans and Wayne's Legion figures for a brief foray into Muskets & Tomahawks. Having weekly meetings with a great group of gamers definitely spoiled me and I owe a lot to those guys for really getting me into the hobby.

A shot from a Force on Force game we played in Williamsburg back in 2012
All that changed when I headed out to California for a MA/PhD program in 2013. Time and money were both in short supply, and even when I did find gaming buddies they usually lived just far enough away to prevent regular meet-ups. As a result, my hobby went  temporarily by the wayside. Then came my fiancee's relocation for work to my home state of Pennsylvania, which, combined with a number of other factors, convinced me to leave grad school after earning my master's degree and join her back east. So in July we packed up a moving truck and her car with all of our stuff and our 85-pound dog and moved to the historic town of Hanover, PA (just a little east of another small, historic town called Gettysburg).

Me (center of the rear rank) at a Napoleonic Wars reenactment last month

So now I find myself back within an easy drive of some of the country's largest historical wargaming conventions, in the epicenter of reenacting in this country, and with the opportunity to take tons of day trips to historical sites and museums. Oh, and until I can get settled in a full-time job, I'm working at a friend's bookstore which specializes in military history and wargaming. Needless to say, it's a pretty good place to be.

To top it all off, my fiancee, Becca, has been gracious enough to designate the family room of her townhouse as my "man cave/game room." Here it is in all its glory (well, most of it at least; I've since gotten a set of larger tables):


The Zulu shield is a souvenir from my semester abroad in South Africa


This blog has several purposes. For one thing, it will serve as a much needed creative outlet from the monotony of working two retail jobs. It will also allow me to share stories and photos from reenactments and my historically-themed excursions (my California-raised fiancee has not seen much of the East Coast). Most importantly, it will allow me to chronicle my progress on future gaming projects and share after action reports of those games once my plans are realized.

Currently, I'm acquiring miniatures and scenery pieces to run the Scottish Corridor (Operation Epsom) pint-sized campaign for Too Fat Lardies' Chain of Command rules and just picked up a copy of The Men Who Would Be Kings colonial rules published by Osprey, for which I am debating running campaigns for the Transvaal War (1st Anglo-Boer War), Northern War (1st Maori War), or the hypothetical "Pig War Goes Hot", but more on that later.

I'm excited about this new endeavor and look forward to the discussions the posts will facilitate.

Becca and I are planning a trip to Antietam National Battlefield and some boardgaming this weekend, so I'll be sure to have another update soon.

'Til Next Time,

Andrew